Wednesday, January 18, 2012

Introduction to the secret tricks for Sleipnir 3 Option Searching!


Today, I would like to introduce Option Searching tips (probably not even known by the members of staff here at Fenrir Inc.!) for Sleipnir 3 for Windows.

I want to display all the options


By inserting an asterisk (*) into the option search, and performing a search, all the options can be viewed in a list.
Scrolling on the option search results screen can be performed, perfect for users who feel going through all the options from the top of the options screen is too much bother.

I want to search more easily

In the optional search fields, even searching with [default], [Set], or [browser] returns [Set as default browser].
Please note that currently, searches are case-sensitive. So searching for [Change] will not return results with [change]. It is possible to search for both [Change] and [change] by inputting them both together with a space between them, [Change change].
A basic search dictionary has still not be set up. However, with future updates, we intend to make optional search fields easier to use and understand.

I want to know more advanced tricks

You can pin-point options by searching with the format: [#<ID>]in the optional search page.
By inputting [#option:SetAsDefaultBrowser] and searching, you can display [Set as default browser] straight away.
By inputting [#option:Language] and searching, you can display [Language for user interface].

The search functions with this ID have the advantage of being fixed regardless of the user interface language.
Please be aware that small and capital letters are distinguished between in the ID.
Also, this function is in experimental stages, so I will stop at just introducing the function, and instead investigate the ID functions that can be used.

And now

So how was it? For users who have never used optional searches, please use this opportunity to give it a try.
So, enjoy Sleipnir 3 life!

Thank you!


---We would love to here from you.---

Please join us on Facebook for Sleipnir for Windows!

Please follow us on Twitter.


Thank you.

Tuesday, January 17, 2012

How to import bookmarks in Sleipnir 3 for Windows

I would like to introduce to you how to import bookmarks in Sleipnir 3 for Windows.
In Sleipnir 3 for Windows, you can import bookmarks from other browsers, or by synchronization through the FenrirPass service if you are using the iOS or Android version of Sleipnir Mobile.

This dialog is displayed slightly differently depending on whether Aero is enabled or not.

When Aero is enabled in Windows Vista/7

[Import bookmarks] can be located in the displayed menu when the top-left button is clicked.

When Aero is not enabled in Windows XP, Vista/7

The menu bar is displayed by either pressing the ALT key, or by right-clicking the tool bar. You can then find [Import bookmarks] in the [File] menu.

Thank you!


---We would love to here from you.---

Please join us on Facebook for Sleipnir for Windows!

Please follow us on Twitter.


Thank you.

Friday, January 13, 2012

Towards the Sleipnir Family icon

Sleipnir Family is not just a Web-browser available for different devices.
Each version of Sleipnir; Windows, Mac, iPhone, Android, Windows Phone, have all been specially designed for their platform.
Today, I would like introduce to you the Sleipnir Family icon.
The common feature of the icons used in Sleipnir is the horse. This horse is designed like the knight used in chess.
First of all, the Sleipnir 3 for Windows icon.

Sleipnir 3 for Windows

This version uses a square shape. Actually, you may not have noticed, but the helm design used in Sleipnir 2 is displayed in the background of the logo.
We used a square icon instead of a round icon because we think it would be more accepted by our Sleipnir users.

Sleipnir 3 for Mac

The Sleipnir 3 for Mac logo is round. Sleipnir Mobile for iPhone/iPad was release beforehand which also used a roundish design. Because desktop browser icons are usually round, we decided to provided users with what they are familiar with.

Sleipnir for iPhone/iPad

Because Safari also uses blue, we decided to use blue in the background of this logo so users do not feel any awkwardness. Also, we simplified the knight icon we use for Sleipnir specially for the iPhone/iPad version. Looks cute, right. The smooth and shiny really suits the iPhone/iPad.

Sleipnir for Android

The Android version was released next. Even though you may of thought it was the same icon, it isn't! The shadowing and feeling has been specifically designed for the Android. You should be able to see that even the blue is very different if you look closely. Providing the best icons is the passion of our designers.

Sleipnir Mobile for Windows Phone

This is the icon of the Windows Phone version of Sleipnir, also square shaped just like the Windows version.
We designed it to suit the tile design in Windows Phone, providing a more subtle design.
And that is everything! Try using Sleipnir Family with your device or PC.
You can even sync bookmarks using the Fenrir Pass service.
Thank you!


---We would love to here from you.---

Please join us on Facebook for Sleipnir for Windows!

Please follow us on Twitter.


Thank you.

5 functions to make effective use of tab groups in Sleipnir 3 for Windows


Tab groups is a new addition to Sleipnir 3 for Windows. The tab groups function itself is also available for Sleipnir Mobile, but there are some functions that are only available for Sleipnir 3 for Windows.
So this time, I would like to introduce a few functions to make effective use of tab groups.

1. Group together and bookmark all tabs in a tab group

Tabs in a tab group can be grouped together and bookmarked in one go by dragging a tab group and dropping it in the bookmark bar or panel. When you do this, the group name is automatically used as the folder name.

This can also be achieved by right clicking a tab group and clicking "Save as bookmark".

The following dialog is displayed.

2. Create a tab group for searching

When you do not want to mix searches with other tabs, you can insert a check in Tools | Customize | Tab group | Group search results.

By doing this, when you perform a search in the search bar, a tab group for searching is created and searches are added in tabs in that tab group.

3. Create a tab group to group the same domain names

Drag a tab downwards and drop it in [Group by domain] in the displayed menu.

Also by selecting [Group by parent-child relationship] you can group together tabs that have been opened from that tab.

4. Change the tab group icon

If the majority of tabs in a tab group are from the same domain, the favicon of that domain is automatically displayed.
However, you can also change this manually by right clicking a tab group and selecting [Change icon].

5. Change the color of a tab group

The color of tab groups are automically set to a color not being used out of the 20 available colors. However, colors can also be set by the user.
Customize the tab group color by right clicking a tab group and selecting [Change group color].


And so that is the end of my brief description of the 5 tab group functions I wanted to introduce.
Also, if you use (1),(2),or (3), you can perform many searches, and then group them together and then bookmark all those tabs in the same group, and then if you want to delete all the search results in one go later on.
You can also perform functions such as [Close all tabs] or [Refresh all tabs] with the TouchPaging gestures, so please feel free to check them out.
If you still have not tried out the tab groups, then I definitely recommend you to give them a go!

Thank you!


---We would love to here from you.---

Please join us on Facebook for Sleipnir for Windows!

Please follow us on Twitter.


Thank you.

Thursday, January 12, 2012

Sleipnir 3 for Windows 3.0.5 released

- Slow down problems and compatibility with IE have been improved
- The issue where operationability stopped when tabs are closed has been fixed
- The issue where the resulting operation when a link is clicked differed with IE has been fixed
- 4 force termination bugs have been fixed

Please download for free from here!

Wednesday, January 11, 2012

How to use Sleipnir 2 for Windows

Sleipnir 2 for Windows 


How to use Sleipnir 2 for Windows
While the latest version of Sleipnir is Sleipnir 3, it has only been available for a very short time.
There will be updates for Sleipnir 3. However, for people who can not wait for certain features to be added, please feel free to use them in Sleipnir 2.
Sleipnir 2 has a large range of customizable functions provided by Fenrir inc. and users of Sleipnir 2.
This includes the ability to customize the design, layout, language, functions, assigned keys, gestures and much more.

Gestures

Not only is there a huge range of gestures available from the start but you can also customize and assign gestures in an almost unlimited number of ways.
The following default gestures are available.

-Move the mouse down while holding down the right-click button->Open new tab
-Move the mouse up while holding down the right-click button->Stop page
-Move the mouse right while holding down the right-click button->Go forward
-Move the mouse left while holding down the right-click button->Go back
-Move the mouse up then down while holding down the right-click button->Refresh page
-Move the mouse down then up while holding down the right-click button->Duplicate active page
-Move the mouse down then right while holding down the right-click button->Close active page
-Move the mouse right,left,right while holding down the right-click button->Close active page
-Move the mouse up then left while holding down the right-click button->Go to upper directory

In addition to the default gestures, you can also create and assign your own gestures.
Go to Tools->Sleipnir options->User Interface->Mouse gesture to go to the gestures screen.
Nearly all the actions listed in the tool bar can be assigned to a gesture combination of your choice.

Useful web-browser shortcuts

Alt + A  Go to address bar
Alt + D  Go to search bar
Ctrl + T Open new tab
Ctrl + F Find on page
Ctrl + W Close an active tab/page

Advanced Functions

There is a wide range of advanced functions and plug-ins available for Sleipnir 2.
Customize web pages with the SeaHorse plug-in.
Develop JScript and VBScript functions with the UserAction Extension plug-in.
Add additional search engines to the search bar.
And much much more.

For more information please visit the link below.

http://www.fenrir-inc.com/uk/sleipnir2/plugins/

Please join us on Facebook for Sleipnir for Windows!

Please join us on Facebook for Sleipnir Mobile!

Please join us on Facebook for Sleipnir for Mac!

Tuesday, January 10, 2012

How to use Sleipnir 3 for Windows

Sleipnir 3 for Windows

Most internet users out there probably just keep to the same functions they have been using since they started surfing the internet many many years ago.
You may be totally oblivious to the ever-evolving browser market, or just don't really care, but there are some really useful functions being used these days.
Some functions are so obvious, but you may just never have realized they exist. Other functions require a bit more effort to use effectively.
I know just how much effort it takes to learn and start using new functions, so I have listed and explained the functions available in Sleipnir 3 below.

Tabs


Tabs are the new necessity of the web-browser world. I remember the days when we forced to open countless new windows.
This felt so disorganized, slowed computers down to breaking point, and was a real pain to deal with later on.
However, recently instead of opening new windows, you can now open new tabs which are all organized and displayed neatly at the top of the page.
Sleipnir 3 excels in tab-usage by provide tabs that open extremely quickly.

Also tabs can be controlled in many new and different ways.

-Drag and drop a tab between other tabs in the tabs bar to move and organize tabs
-Drag and drop a tab into the active window/address bar to open/refresh it
-Drag and drop a tab into the search bar to search for the link of that tab in your desired search engine
-Double click a tab to protect/unprotect it(Protecting tabs prevents a tab from being accidentally closed)
-Hold down a link to open it in a new tab
-Click the "X" on the right hand side of a tab to close that tab
-Hover over a tab for a few seconds to display options for that tab
-Open a new tab by click the plus symbol on the right of the last tab
-Display open tabs in a list by click the downwards arrow to the right of the last tab
-Open a recently closed tab by clicking the clock symbol to the right of the tab bar
-Drag and drop a tab into the bar above to open it in a new tab group(tab groups explained below)
-Drag and drop a tab into a tab group above to move it to that tab group

Tab groups
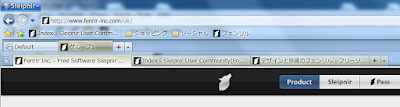

Open a new tab group by clicking the plus symbol at the right side of the last tab group
Display/Hide tab groups by clicking the box with two buttons displayed to the left of the tab bar
Display tab groups in a list by clicking the downwards arrow at the right hand side of the last tab group
Refresh all tab groups by clicking the box with 2 green arrows displayed at the right end side of the tab groups bar
Close a tab group by clicking the "X" on the right hand side of that tab group

Gestures

Control your web-browser just like when using a tablet device just by using your mouse.
By performing certain movements when holding down the right-click button on your mouse, you can activate many various functions.

TouchPaging using gestures with Sleipnir 3 for Windows

Now I want to introduce gestures to efficiently use TouchPaging.

Many of you might read this and initially think "But gestures can only be done on a touch-screen device, right?". Well not exactly.
Yes, Sleipnir 3 is a PC web browser, and we are not at the point in time where normal PC monitors use touch-screens.
However, with Sleipnir 3, you can experience the same easy-browsing felt on portable touch-screen devices by using the mouse.
Normally the mouse is used to move the cursor, but by holding down the right-click button and then performing a movement, it is possible to perform various gestures.
This makes it possible to quickly move between tabs and flick to other parts of a page which we call TouchPaging.

The gestures that can be used for TouchPaging are displayed below.
For more information about TouchPaging, please visit our official site - http://www.fenrir-inc.com/uk/

Default Mouse Assigned Keys

The default mouse assignments are listed below.

Push wheel up while holding down right-click button-> Previous Tab
Push wheel down while holding down right-click button-> Next Tab
Push wheel up while holding down left-click button-> Back
Push wheel down while holding down left-click button-> Forward

Full-screen mode


You can enter full-screen mode by clicking the black box with a square and an arrow pointing up-right just below the "X" at the top right of the page.
With the increase in functions being added to web-browsers over the years, you probably have found your web-browser etc. using up way too much space to display these functions.
In order to deal with lack of space efficiency, the new trend is to make web-browser space-efficient, and clever.
When you want to watch videos or read comics and books online, sometimes there is no full-screen mode normally. This usually occurs in sites with advertisements.
In this situation, you probably would feel much more comfortable viewing your desired media with as little unnecessary content on the screen as possible.
This is where the full-screen mode really comes in useful.
However, with Sleipnir 3, the full-screen mode offers a lot lot more.
Firstly, tabs are displayed at the bottom of the screen.
Not only can the contents be viewed as a thumbnail, but you can also scroll through the tabs without having to actually change the active page.
You can use gestures in full-screen mode. This really provides the atmosphere of a tablet device.

Bookmarks

Import bookmarks using the bookmark import function.
Even if you really like a different browser, the hassle of dealing with all your bookmarks can really put you off switching to your desired browser.
However, with the bookmark import function you can import all your bookmarks in no time at all.
The bookmark import function can currently be used for importing from the following sources.

Internet Explorer/Grani
Sleipnir 1
Sleipnir 2
Google Chrome
Firefox
HTML file
Opera
Lunascape

Useful web-browser shortcuts

Alt + A  Go to address bar
Alt + D  Go to search bar
Ctrl + T Open new tab
Ctrl + F Find on page
Ctrl + W Close an active tab/page

Advanced functions

Change the engine

When using Sleipnir 3, pages can currently be displayed for the following engines:
Internet Explorer 7
Internet Explorer 8
Gecko

Please join us on Facebook for Sleipnir for Windows!
Please join us on Facebook for Sleipnir Mobile!
Please join us on Facebook for Sleipnir for Mac!